Social Icons

Showing posts with label Garden Calendar: March. Show all posts

March 2, 2012

What can we plant in March in Florida?

Warm weather is here, and Florida gardeners are preparing for the summer harvest. All main warm weather vegetables (tomatoes, peppers, and eggplant) should be transplanted now.


Pepper Transplant

Unfortunately, it is too late to start tomatoes, peppers, and eggplant from seed. It usually takes about six weeks from seed to transplant size, and that will bring us to mid-April for transplanting; this is too late because May heat will be too brutal on the young plants. Big box stores carry transplants, these will do the job of providing summer vegetables. Mark your calendar to start the seeds in early August for the second Florida season of warm vegetables.


Tomato Transplant

Some vegetables can be still started from seed, these include cucumbers, squash, zucchini, corn, and beans.

Cucumber two weeks old from seed

Seed these directly into the garden and keep the soil moist all the way until the seedlings get established. Shade off young seedlings of cucumbers, they do not like direct afternoon sun or being dry at the roots.

My addiction to seeds brought upon a strange challenge. I was seeding a lot of vegetables and did not mark some of them. These seedlings came up and looked like a cucumber plant. But now I am at odds. It is quite a strange looking plant, so if anyone can identify it, please let me know in a comment. Otherwise, the mystery plant will have to produce the fruit to uncover its nature and purpose.


Mystery plant - identified! Milk Thistle

You might also like: Picnic Time Gardener Folding Chair with Tools


August 7, 2011

How to transplant tomato seedlings Part 1

August and March are prime months in Florida for replanting tomato, pepper and eggplant plants. Whether you germinated these seedlings from seed or purchased ready seedlings from the store, it is time now to put them into the ground. They need about a month and a half to start pollinating, so that brings us to the beginning of October for the fall season and sometime in April for the spring season.

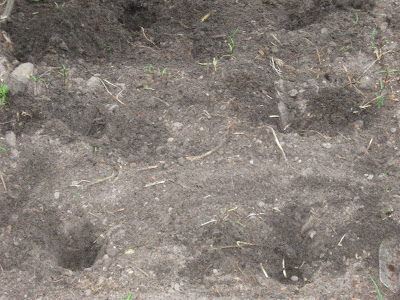
You should have the soil ready by now, so mark planting holes about 18 inches on center:


Now, dig one hole with the small garden trowel to try to dry-fit the tomato into the hole:


We can see from the previous picture that the hole is too shallow, too much of the stem is above the ground. Usually we would want eighty percent of the seedling to be buried under to promote root growth from the stem as well as cool the roots and allow them to reach the moisture and nutrients. Dig some more dirt out and dry fit again:


Now it looks much better. We can gauge that most of the plant would be buried under the ground level.

Granted, my beds are double-dug to at least a foot deep so I can accommodate eight or ten inch hole for the transplants. If your beds cannot go as deep and the transplants are tall, you can horizontally lay them, that is dig the hole as deep as you can, put the transplant in and lay the rest of the stem on the ground, covering it with the soil. This will allow the roots to grow from the stem. The roots are the heart of the plant, the better developed the root system is, the healthier the plant will be.

To take the tomato out of it's container, we put the stem between index and middle finger and turn the container upside down:


Now gently lower the seedling and the root ball into the ground and fill with soul tapping around the stem lightly. As we can see, most of the transplant is covered with the soil, just leaving the top leaves above the ground. You do not have to repeat this process for each of the transplants. Generally, the soil in you garden will be of the same relative depth, so you only have to try one transplant to determine the depth of the holes for the rest of them.


An old Indian tale goes that you should put a banana peel and an egg into each tomato hole. This tale has merit; banana peels provide potassium and an egg provides calcium to the growing tomato seedling. When an egg decomposes, it provides sulfur for the fruit. In my garden banana peels, egg shells and other organic waste is added constantly to the soil, but if you are planting in a new garden, or a garden that is not very fertile, this Indian advice is worth a try.

Water the seedling at the stem thoroughly. Keep watering if there is no rain, every day for about a week, that's how long it takes for it to get established. After that, again, if there is no rain, water every other day or twice a week. A good rule of thumb, literally, is to stick a finger into the ground and see if it feels moist at the second knuckle. If it does not, water. I usually give my tomatoes a half-gallon watering twice a week at the stem, not overhead.

July 16, 2011

Planting black beans from the grocery store


This year I tried planting some black beans from the grocery store. Beans are usually planted in March and September and seed to harvest time is around two to three months. Spacing for the beans is three to four inches, and if you plant in a "square foot" method fashion, then there is no spacing for the rows. I planted approximately sixteen square feet of black beans just to try them out. They were not pre-soaked, I planted them dry. Depth of planting is about an inch. Here's these black beans two months after seeding:


Black beans from the grocery store, as probably any other commercially grown beans are bush beans and they do not need support, they vine on each other. They do send out vines outside of the boundaries of their bed, but that is easily fixed, just direct the vines back on to the other plants.

Black beans have some pretty purple flowers:


And they are loaded with bean pods. I have to admit that they are not as tasty as green bean varieties if you try to cook them as a grean bean, but I grew them for the purpose of dry hulling and having organic black beans.


Some pods are getting ready to be harvested:


These beans are very heat tolerant. Instead of planting them in a suggested time frame of February-April I planted them in mid-May. They tolerated heat and humidity pretty well. A robust bean, thumbs up!

Related posts:


Florida Gardening

Florida Gardening Blog

Visitors from all over the world

Grow Your Own Food

Grow your own food, be independent, healthy and happy.