Social Icons

Showing posts with label Garden Designs. Show all posts

May 20, 2016

Natural Plant Supports in the Garden

Moving away from the conventional. Towards natural, easy, less-work. Evolving.

When I just started gardening, about ten years ago, I joined the league of hardware store customers, buying plant supports, stakes, cages and other inventions, and then installing and removing these contraptions every gardening season. It is a lot of work.

Ideally, in my "ultimate" garden there will be no outsiders. Plants would thrive together relying on each other's community-valuable qualities, among which is the ability to support climbers.

Another thing to mention, is that in Florida we don't have to worry about "full-sun" requirements. If anything, there is too much full sun in the Summer, and for the most part in the Winter too. Shade is welcome in Florida gardens. And with shade come trees. Yes, it is beneficial to have trees in the garden.

Cucumbers are cool-loving plants. Naturally, we would want to start them from seed when the last frost had passed, something around the end of February. But in doing so we are inviting cucumber borers whose season coincides with this traditional cucumber planting time. Should we wait longer, and it is too hot for the cucumbers to thrive.

This year I experimented with seeding cucumbers in April, under the trees. Turns out this was a smart decision.


Here's five cucumber plants living happily in the same container under a wax myrtle tree. Even if I step outside now and the air temperature is in the 90's, it feels much cooler next to the fence under this tree. Cucumber does not seem to mind not having "full sun". On the opposite, it likes cool moist ground, plenty of small branches to grab on, and dappled shade.

The wire around the plant is to protect it from my ducks. If you don't have other two-legged hooligans in the garden, you don't need the wire.


This is very encouraging. And I will continue experimenting and seeding cucumbers under other trees throughout the summer. 

A side note - I believe planting in containers next to the trees is the way to go, versus digging the hole next to the tree roots. An additional benefit to having a container is that when you water the plant, some water will trickle down to the tree roots and feed the tree.

P.S. This cucumber is Sumter. I love this strain, it is tasty and resilient.


January 30, 2016

Coffee Seedlings! Growing coffee trees from seed in Florida

In one of my previous posts I talked about my coffee forest consisting of four coffee trees. At the time of this post I planted about twenty seeds from my own harvest. I have never done this before. From what I read on the Internet, coffee can take somewhere from two to six months to germinate from seed.

This morning I was so excited to see two of the seeds sprouting!


So, it's been about two months since planting. As you can see, I just used a regular seedling tray, a leftover from some plants I bought some time ago, that I filled with potting mix. The tray sat on my counter, covered with wrap. Temperature was in the 60's to 70's the whole time, as it is Winter now in Florida. Quite possibly they would've sprouted earlier if the temperature was higher.

However, I would not stand by that statement. I don't know enough of sprouting coffee. Maybe it sprouts in cooler temperatures in anticipation of spring.

I had a good harvest from my existing coffee trees. They are easy to grow and are fun to look at. I am certainly willing to expand my coffee forest to as many trees I can get my hands on, or however many will sprout.

December 9, 2015

Growing Coffee in Florida

A while ago Publix used to sell little Angel Trees. I always liked to ruffle through these cute puppies that were just begging to take them home. They were always some unusual and exotic seedlings; some died, some survived. Among few of these floral treasures was a little coffee tree, not more than a few inches tall. Following the directions on the label I transplanted it to the larger pot, and that was mostly the extent of my care for this plant. The next winter it almost froze to death in my unheated green house.

Surprisingly, it grew new shoots from the root and became even prettier and bushier than before. Inspired by such unexpected horticultural success, I ordered three more coffee plants from ebay. At that time Publix was not selling coffee seedlings anymore.

Time has passed, and short five years later I have a mini coffee forest that's not only a pleasure to the eye, but also a producer of some fine Arabica.


Even though coffee is a tropical plant, it does not like Florida's radioactive summer sun, so it must be planted in a semi-shade environment. I planted mine right next to the 6 foot wooden fence, in large containers, close to each other. Thinking back, I should have cut the bottoms of the containers to allow for root growth. And maybe I will venture to do that this coming spring, although this will not be an easy task: these containers are extremely heavy. The reason for planting them in containers was that coffee does not like soggy soil either. In the summer, even with all the sand, water can stand close to the surface, so coffee roots will rot. It might sound like coffee is a picky plant, but actually it is not. Just provide a semi-shaded corner or side of the fence, protect it from direct sun and wind, and don't let it sit with wet feet. Give it some fertilizer, water when soil surface becomes dry, and that's just about it.


They started fruiting the third year, but only produced a few beans. This year, however I am having a full harvest. Coffee beans cover the branches just like berries, prolifically, but not evenly ripening. It is a chore to keep picking and processing the harvest. I came to appreciate coffee that comes from Brazil or other countries for relatively cheap price compared to the labor needed to make a final product.

After picking ripe beans (they will be soft and dark red in color), the beans need to be soaked at least 24 hours in tepid water. The water should start bubbling - that's when you know coffee had fermented. I have no idea whether commercial processing involves fermentation, but that's something I found on YouTube when I was searching for some information on how to shell the beans. It is practically impossible to shell them without soaking.


This is my third harvest this season. After shelling and drying this amount will reduce to about one fourth in volume. Actually, the outer skin is soft and juicy, and sweet to the taste. But I don't know whether it's edible, so I err on the side of caution.

After soaking, you have to squeeze coffee bean from the pulp and leave it to dry on the counter, mixing once a day. The drying process takes about a week.


The fun part, of course, is making coffee from your own harvest. But before that coffee beans need to be roasted. I tried this once, and have to admit that this will be a skill requiring mastering. I messed up my first batch - did not use cast iron skillet, just used the regular one, and I burned it a bit too much. But still, how sweet are the fruits of one's labor. I thoroughly enjoyed my organic, hand grown cup of coffee.

At the end of this season  I estimate I'll have about one to two pounds of dry coffee beans from my four trees. Using simple math, if your family consumes 20 pounds of coffee per year, then you need 40 trees: if I get 2 pounds from 4 trees, then to get 20 pounds I need 4 times 10 = 40 coffee trees. This might sound like a lot, but if you have some room, maybe a fence around the property, or other shaded area, you might be able to squeeze them in. The other consideration is a large number of blankets to cover them in the winter when it freezes. It takes me three comforters to cover my four coffee trees : they are literally butt to butt next to each other. So one comforter goes on the top, and the other two to wrap around the bunch. They absolutely need to be covered securely; Christmas lights will not be sufficient. 

All in all, coffee is pretty easy to grow. Not as easy as papaya :) or other natives, but not too difficult either. Some labor covering them on frost nights, and harvesting and processing the beans - otherwise a pretty and useful plant. Consider it.


April 16, 2015

Companion Planting

In my never ending quest to grow more greens and to extend greens growing season I am experimenting with companion planting, and especially with growing dense and mulching heavily.

What tipped me off in this direction was the experience of harvesting sweet potatoes during some dry times of November. As I pulled the vines that covered the ground densely, I noticed that the ground under the vines was wet and cool while the rest of the garden was suffering from thirst. As I harvested all the potatoes and discarded the vines to the compost pile, the soil where the sweet potatoes were dried out within a day.

Usually regular greens like kale and collards are pretty much done by June. They simply stop growing and wilt away. I accepted that fact as part of Florida growing seasons. But this year I am trying to extend my greens well into the Summer.


The idea is to cover the soil with plants having no empty areas so that the leaves would shade the soil and keep the moisture in while lowering the soil temperature. I am diligently mulching the beds with grass clippings and so far the method works.


The bed above has collards, Buttercrunch lettuce, buckwheat, and bush beans growing together densely, and mulched with a layer of grass clippings about two to three inches deep between the plants. Granted it is not July yet, but we had some over ninety days, and the plants did not wilt. It also helps that this bed gets shade in the afternoon.


The curly leaves in the picture above is Russian Kale. I stumbled upon the seeds at Tractor Supply and just had to try them. It is amazingly juicy and tender kale, and now is my favorite. This kale is interplanted with beans, buckwheat, and broadleaf mustard greens. I am very curious as to what will happen to these beds in the mid-Summer. I am seriously hoping to have enough greens for my salads from these beds; it is definitely a worthy experiment.

February 16, 2013

Planting Vegetables in Wood Chips

I am trying something new. Instead of planting in soil, I am plating in wood chips. I did not plan it like that, it just sort of happened. I had a new set of raised beds built, but did not have soil for them. Then, after some research, I found that the beds can be filled with free wood chips that the power company delivers. The plan was thus born. I had a huge pile of wood chips delivered to my front yard, and there I went. Loading wheel barrows of chips and loading my new raised beds.


The wood chips themselves are not just pieces of wood, there are also chopped up small green twigs and even some palm leaves. That is a good mixture, although a bit poor on nitrogen (green matter), but still not totally devoid of this important nutrient.

Next thing I did was to seed some legumes. I am preparing this bed for the Spring planting of tomatoes, peppers, and eggplant. So the fast maturing legumes will serve as a cover crop. I planted the whole bed of black beans, just sprinkled with soil on the top of the seeds. Here they are starting to sprout:


And the rest of the beds I planted with cowpeas with the intention of tilling them in. I left a portion of the bed completely with no soil, as my test bed. Looks like cowpeas do not care if they don't have the soil. They are sprouting just as nicely:


I have cardboard on the bottom of these beds. Once cardboard rots it will allow the roots of my vegetables to penetrate even deeper into the soil below, under the decomposed wood chips. I do expect this whole concoction to pack down very heavily, but then I can always call the power company and have another load of wood chips to be delivered and added to these beds. 

I am very hopeful of this growing method, and in fact if this goes well, my next plan is to raise all my existing beds and add piles of wood chips to them.

September 8, 2012

How to build a garden - Part 3

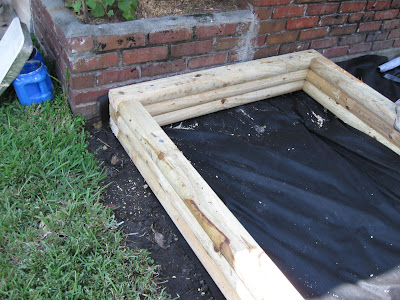
Finally, my garden building project is coming to a completion. The beds are all built and I filled some of them with the grass clippings just to hold the landscape fabric down, although this step is not necessary.


Now, what's left is covering the fabric between the beds with mulch, hauling in the soil, and of course, the most important part - planting.

With the help of a vigorous 24-year old I had my beds loaded with nice soil, and even started transplanting tomatoes and parsley. Mulch is partially laid out, and the paving stones are placed on the top of the mulch - for stability and preservation of the landscape fabric.


I am not yet completely done with this project, still have mulching to do, and arranging the stones, but the planting work can be completed even without the mulching part. In fact, we are in the middle of transplanting tomatoes, peppers, and eggplant seedlings right now, in our second warm season of the gardening year.

Now, for the cost.

In addition to the landscape fabric, I used:
47 landscape timbers @3.59, to the total of $169
I will use approximately 40 stones for this garden, $1.24 = $50
Hauled in bulk soil from a nursery - 6 cubic yards, $270
And 1 cubic yard of mulch, $23 (bulk)

So far total is $548.

Yes, it is a lot of money. My total growing space in this 12x22 foot garden equals to 176 square feet (not counting walkways). What can I grow in a 176 square feet? You can run calculations based on the vegetable spacing requirements, but just for this season I will fit these vegetables into this garden:

50 tomato plants
30 pepper plants
20 dinosaur kale
10 parsley
10 dill
and maybe some other greens tucked in here and there.

And the minimum yield will be (that is if I totally suck as a gardener - usually you should get much more that these estimates):
50 pounds of tomatoes
30 pounds of peppers
20 pounds of kale
2 pounds of parsley and dill

Think about it. How much would you pay for a pound of organic tomatoes? I have an answer - $4.99/pound. Even more so for the organic peppers. Quite frankly, Publix or WinnDixie do not sell organic kale, period, so I cannot even run a comparison.

Well, my point is - if you can afford building a garden space like that, this is a fast and least effort consuming method of jump-starting a garden in a previously unused lawn space. If you cannot afford to have a garden built like that, you can always revert to a free (but labor-intensive) double-digging method.

Update 9/14/2012: All planted and ready to enjoy:


Update 10/23/2012: In full bloom and starting fruiting:


How to build a garden - Part 2

How to build a garden - Part 1

September 1, 2012

How to build a garden - Part 2

The raised bed garden building continues. Today I started laying landscape fabric over the grass. Prior to that step I gave the lawn a good tight cut, and laid the fabric overlapping about six inches on the seams.


Why did I go with the landscape fabric and not the cardboard, or newspapers, a popular choice in building raised beds? I did not want to give crabgrass and Bermuda grass any chance of surviving; and these two are my biggest enemies in the garden. Granted, the package said that "no landscape fabric will stop Bermuda grass and crabgrass", as it grows even through asphalt, but I am taking my chances because the fabric will be covered with a foot of soil, and secondly, I have a row of raised beds that is built on top of the grass, and it survived just fine, even  being only six inches tall. The only problem with this bed is that the grass creeps in through the sides; the problem that I am hoping to overcome by having the bare barrier around this new bed.

After the fabric was laid, the bed construction has begun. I am building this garden from landscape timbers so it will last a long time and not cost too much money.

The timbers are laid on the edge of the cut area where the sod was taken out, but leaving at least a six inch strip of bare land all around the bed area.


I am making my beds three timbers high, which will give me nine inches of height from the ground. From there, I plan on filling the beds with soil, tapering three inches over the edge of the bed, which will give me a total of a foot of growing depth. This depth will be totally sufficient for most vegetables, including tomatoes, peppers, short carrots, all kinds of greens, like kale or lettuce, all herbs, cucumbers, beans, beets, and so on. The only vegetables that might need a deeper soil would be squash, daikon radish, and maybe the vegetables that need deep sturdy staking (as I cannot drive stakes through the landscape fabric). All in all, looks like I can grow practically anything in these beds.


And here we are, first bed is complete. I chose to go with an L-shape to make the square area more interesting, as well as space-saving.


It took two men three hours to build this bed. They used heavy duty landscape nails to connect the timbers together. 

So far, the cost of material is $36 in landscape fabric (I picked up two tubes of 3x100 at Walmart).

I already bought the timbers, nails, and paving stones, but do not know at this point how much of these will be used to build this garden space. Will calculate when the beds are complete.


You might also be interested in:
How to build a garden Part 1
Double-digging garden beds
Vegetable yields per plant

August 31, 2012

How to build a garden - Part 1

I was in need of more garden space, so instead of my usual endeavor of double-digging the beds, I decided to build a raised bed garden for a change. There were a few reasons for that decision.

First, the area that I was working with was kind of low laying, so the dug beds would have suffered from too much standing water.
Second, I wanted to build  a good size gardening space in a hurry; it needed to be ready for planting before the fall season.
And third, I wanted to experiment with the raised bed design where there is no grass in between the beds. I wanted to see what it would cost to build such an area, what kind of work would be involved, and how feasible the whole thing was going to be.

This is the area I started with:


The building wall is East facing. So, this area gets morning sun up until 2PM or so, and then gradually starts to shade. At around 5PM the whole area is shaded from the hot afternoon sun. This is actually perfect for our damaging Florida sun, as the plants will get their needed sunlight, but would not be burned by the heat of the afternoon rays.

To make it efficient and cost saving, I decided to make the garden area in multiples of 4, which is a half of a regular landscape timber. So, my garden area is going to be 12 foot wide and 23 feet long (1 foot subtracted for the entry), making it two beds, one bed 10 feet long, and the other 12 feet long.

Now, the measuring started:


After the measuring was complete, I started to take off the top layer of sod so I could prevent the weeds from creeping in to the garden beds. I decided to keep about 6 inches of a barrier around the beds, of bare ground that would be maintained bare by raking.


Certainly, it is difficult to take a precise measurement of sod on such a large area, so I gave myself some play room by taking about a foot of sod off around my measured perimeter.

While at it, I dug out a little apple tree that was growing in the area and brought it up eight inches so that its roots do not stay soggy when we have our summer rains. I have good hopes for this apple tree.


So, here it is, first step of how to build a garden. The whole process took me about ten hours of work.

How to build a garden - Part 2

August 16, 2012

Mulch Types

Normally, when people think of mulch types they recall the stuff that is sold in bags in box stores. After all that's what's called mulch. But behold, there are many more possibilities for mulching the garden.

Yesterday I was cleaning my garden beds in preparation for the fall planting season and instead of piling the weeds into the compost bin I put them aside, in a wheelbarrow. Why? Because weeds make excellent mulch. Note right here though, if the weeds have seeds on them, do not use them as mulch, but compost instead. I lucked out and picked the whole wheelbarrow of non-seeded weeds, such as grasses and small brush, as well as spent vegetable stems, including my beloved cowpea. To top off the pickings I cut the branches of some vegetation that was intruding through the chain link fence. So, here is what I ended up with:


Certainly, you cannot just pile that stuff into the garden beds and call it work well done. As I was talking to my mother on the phone (wearing the passive headset : Amazon link), I managed to chop all this stuff with my trusted Felco friend into small pieces within two hours. Now I have two bucket fulls of nice mulch:


So, now I have something to work with. I spread this mulch into the bed I was working on, about four inches thick. This amount was enough to cover about twelve square feet densely:


Unusual mulch type you say? Hang on just a second.

This mulch consists of mainly two types of material: Green (weed grasses and leaves) and Brown (dried spent vegetable stems such as cowpea, amaranth, and okra, as well as brush stems). This is a perfect composting combination. This mulch will serve a dual purpose up until I am ready to plant in September. It will keep the ground covered to protect it from drying out, it will decompose some on the bottom to provide nutrients, and it will encourage insect life which is needed for the garden ecosystem.

Whatever you do, mulching with any types of mulch is better than keeping the ground bare. Weeds are opportunists, they will propagate whenever they find a spot that is not covered. You might want to look around your yard to see if there anything that can be chopped up and used to improve your beds.

August 11, 2012

Mulching Lawn Mowers

Mulch, mulch, mulch -- you cannot get too much mulch in the garden.

What's good about mulching?

  • Mulch suppresses the weeds. Who wants to pull nasty weeds all the time? It is much better to take preventative measures and disallow weeds from sprouting in the first place.
  • Mulch keeps moisture inside the ground by slowing evaporation
  • Mulch keeps plant roots cool by reflecting the sun and providing a barrier between the damaging sun rays and the depth of the ground
  • Decomposed, mulch adds to the fertility of the soil

Today I added this thick layer of mulch to one of my 4x4 foot beds where eggplant is growing. I used mulching lawn mower (my new toy, yay!), it's electric! lol. But, in any event, this bed was suffering badly because the ants made a pile in that bed and I was skirmish to de-weed the bed at the fear of ant bites. But finally I got over myself, put the gloves on and took the weeds out and gave ants a good two-day bath. They found a new home, I suppose. But the bed was sitting there naked. So I mowed the lawn with my mulching lawn mower, bagged the mulch of course, and put it around the plants. I can see how the plants love it already.

Now, some people have concerns about adding grass clippings as mulch because it might compact. I have not found this to be a problem. And even if grass compacts a little, all it takes a little raking to loose it again. It is far better to have grass clippings as mulch than not mulch at all.

I always struggle to find enough mulch in my garden, and believe me, I use every shred of weeds and garden waste to mulch. But only since I've gotten this new shiny toy of mine that I have plenty of mulch.

Two things to keep in mind: first, if you are an organic gardener, then you cannot fertilize and pesticide your lawn. I don't use any chemicals on my lawn, that's why my grass mulch is safe for my garden. Second, don't let the grass go to seed - if it does it will sprout in the garden beds. If the grass went to seed, it is better to not mulch it, but just leave it on the ground to fertilize the lawn and have it replenish itself.

And finally, if you are curious how I make grass mulch out of my lawn with my electric mulching lawn mower, watch this YouTube video I have:


In any event, we have about two months until we go heavy into the fall planting. If you have a lawn and a mulching lawn mower, start piling these grass clippings into your beds. Six or even twelve inches of clippings is not too much for the beds. They will decompose to almost nothing before you start planting your fall plants, but will provide a lot of nitrogen and other nutrients for the garden.

July 15, 2012

Raised Garden Beds

Woo hoo! It's been a whole month away from my blog, and I feel pretty ashamed of myself. But, to my excuse, we cannot do that much in the summer in Florida, other than waiting for the cool weather to come back so that we can start planting our veggies. But I do have an exciting project to share with you - a plan how to build raised garden beds on the cheap!

My mother moved to a new place and was eager to start a garden. The problem with her property is that it looks like it's located on the beach, there is nothing but white sand, and what's worse, there is no suitable vegetation to build compost from. So, we had to make a raised garden bed for her.

Being a senior citizen on a budget, she only had so much money to spend on that venture, so we had to be creative. After reviewing a multitude of options, mostly comparing by longevity and cost, we settled on a plan that involved landscape timbers. Granted, these are treated, but because in today's day and age that treatment is not as deadly as it was two decades ago, we decided that it was OK to use these, besides, there is only a small surface of dirt that would be immediately contacting the treated part.

She wanted a large garden bed, so we purchased fifteen (15) landscape timbers, 8 foot length each. Stacked three timbers high, these gave her a nine (9) inch of height and four by sixteen (4x16) perimeter. The timbers are held together with eight inch stakes that look like huge nails. They have them next to the timbers at Lowes or Home Depot. Here's a close-up of the raised garden bed structure:


To fill this mass of a garden she would need a lot of soil. But, she has a few oak trees on the property, and a lot of fallen leaves. She raked them up and fill the bed half way up with these leaves. The, we called around and found a place that delivered top soil. She filled the rest of the bed with top soil, humping over the top of the bed because the leaves will decompose and settle pretty quickly, and she did not want to end up with a half-filled bed. So, here's the finished raised bed:


The cost was around $180 total (not counting the mulch) - $90 for the timbers and about $90 for the soil including delivery.

I should note here that this soil is not sufficient to grow healthy vegetables; although it is nice and black, it is not very loamy, so there will have work to be done enriching it with compost and vegetable matter.

What I like about this setup is that you can sit on the edge of the bed while doing your weeding or other garden work. Another good thing is that this is actually a huge bed; if you are into square foot gardening, this bed will give you sixty four (64) squares. You can feed a family on 64 squares!

All in all, the project turned out very nice and worthy. Considering that you could build a humongous raised garden bed with soil for $180, it is certainly a thing to consider.

September 22, 2011

To ferilize or not to fertilize?

...that is the question. I meant synthetic fertilizers in that context.

Strict definition of organic gardening does not allow use of synthetic fertilizers, and for a good reason. If we are in it for a long term then we need to build the soil, not just feed a plant. Soil building includes adding a lot of organic matter so that the soil becomes moisture retentive as well as drainable and rich in nutrients for the plants themselves and supporting fauna - earth worms and other organisms.

But what do you do if you are in an emergency situation - your plants need feeding but you did not have an opportunity to properly build the soil yet? I would compromise at this point, as long as you have a long-term plan on building rich soil in your garden.

What kinds of synthetic fertilizers should we use? I would forgo generic 6-6-6 or 10-10-10 NPK (nitrogen (N), phosphorus (P) and potassium (K)) because while these are just enough to sustain plant's requirements, they are not sufficient to feed a human body. We are in it for the healthy food, are we?

In an emergency situation like that, for example if I do not have much time until the season's end and the plants are not doing so well, I would add some synthetic fertilizer, but one that contains more minerals. Here's the one I use in these situations:


It is quite expensive, about eleven dollars for this bottle, but it is worth it. First, it covers a lot of ground, literally. Second, it contains trace minerals such as copper, iron, zink, magnezium and calcium. Plants can survive just on NPK, but evidently they need more than that, not mentioning that we, consumers of the fruit, need these minerals. Speaking of calcium, you can add it quite inexpensively to the plants that need it the most: tomatoes and peppers. Just get crushed oyster shell at Tractor Supply, a huge forty pound bag for about eight dollars, or crush egg shells finely and sprinkle around the plants. Calcium is needed to prevent blossom end rot in tomatoes and peppers.

Fertilizers in this Miracle Gro mixture are not evenly balanced, like 10-10-10, for example. Instead, they are more like 9-4-12, so they are heavier on nitrogen and kalium. Folks at Miracle Gro must have figured it out.

Bottom line is, nothing will replace good organic soil building, for the long and short term as well. But if you see that your plants are stunted and growth season end is within reach, use the synthetics to give your plants a boost, but select a good one and plan for future organic sourses of fertilizers, namely cover crops and compost building.

September 19, 2011

Do you have a counter top composter?

If you are a gardener, and you are concerned about health quality of your produce, and you have kitchen vegetation leftovers, then, well... you should have a collector for your kitchen waste.

I simply use a 34 oz plastic coffee can for this purpose:


Now, it is not mandatory to have plastic can like I have. It can be metal, but be aware that it will rust in a number of months, although it is not a big deal if you are a coffee drinker, like your's truly. Just replace it with a new one. The point here is that you have some sort of container to collect your kitchen waste and you do add it to your garden soil.

What can go into that pile? A short answer would be - anything plant based. A detailed answer would be - all your vegetable peels, including onion, garlic, carrot, etc., also broccoli stems, cabbage stems, you got the point. Coffee grounds with the filters, tea bags and any non-cooked vegetable leftovers.

Now, for the cooked ones - I would not recommend putting spaghetti and rice there. Not that it cannot decompose, anything will decompose with time outside of plastic, but these items will attract rodents and flies, and you do not want that. Absolutely no oil or other buttery products. These will clog up your soil and will take ages to decompose. No meat. Granted, meat is great fertilizer for your plants, but it will attract mice and ants, and this will present the problem, unless you bury these items very deep into the ground. 

So, once your container is all filled up, just dig a hole about a foot deep in the unused portion of your garden and bury the contents into that hole. You would be surprised to find that after just a few weeks all that stuff will be reduced to nothing just due to the workings of nature. Happy composting!

July 28, 2011

Cowpeas as a cover crop and green manure

What a versatile vegetable! Not only it is insanely productive, not bothered by pests and requires little attention, it also provides fertilizer for the garden even after it stops producing. The idea of a cover crop is to grow nutrient-rich plant, such as legumes, and plow it under to improve soil fertility. A cowepea in Florida is just that plant. We can plant cowpeas from March to September and dig them in even after we harvest the crop. Ideal time for digging cowpeas in as a green manure is when they are still young, have lush green leaves and their stems are not too thick, like this:


Granted, if you plow cowpeas under at this stage you will forgo most of the crop. If you need to improve soil fertility in a hurry, then this method is acceptable, after all a pound of cowpeas at a grocery store is only $1.69 or even cheaper. But in the event that you want to have a harvest and utilize cover crop quality of cowpeas, the more mature stage of this vegetable is still acceptable. Below is a picture of a cowpea patch that I kept harvesting until the plants are mostly dry:


In this situation you will just have to chop them smaller, for the stems - about three to four inch long, if you have patience.


Then just dig the stems and leaves into the ground. It will help if your shovel is sharp because you might have to break stubborn stems with it:


Keep the soil moist, water it if there is no rain. It might also help to cover the soil with newspapers or cardboard to keep it moist. This cover crop should decompose in about a month, just in time to transplant tomatoes into the ground.

July 20, 2011

Vegetable yields per plant

My cool new little toy, mechanical kitchen scale. Green, baby!


Would not it be nice if we could plant a garden and always have plenty of vegetables and desired variety. Actually, yield planning is the hardest part because of so many variables that are out of our control, e.g. pests and weather. I read somewhere that an old farmer said "plant one plant for the weather, one for the pests and one for yourself". We probably should not take advice literally because it's quite an overkill, but it would be prudent to plant maybe 10 to 20 percent more than you need to account for the losses.

Many county extension offices post vegetable yields files on their websites. I also included that very common information here for the convenience of my readers.


How do you use this information? Look at your grocery store receipt. For example, if you are buying a pound of carrots per week, then you need 10 feet of row of carrots every seven weeks because 10 feet row yields 7-10 pounds of carrots. We can see that spacing for carrots is 2 inches, therefore you need to plant 60 carrot seeds (10 feet = 120 inches. 120/2" = 60). Multiply that by 120% (for the losses) and you get 72 seeds. Easy.

A one foot row of carrots spaced 2 inches:


I have to mention that I don't plant in rows, I plant in blocks of square feet. A 10 feet row can be broken down in 10 smaller rows of 1 foot each and 6 of these smaller rows could be planted in one square foot of a garden because the 2 inch distance now becomes the distance all the way around.

If you are planting square foot method, I would recommend increasing the suggested distance. The plants need room to breathe; they get that room if planted in rows, but will be crowded if planted the same distance in a square foot garden. How much to increase? I would double it to be safe. Even with the increased spacing you will still need less land to plant the same amount of vegetables compared to rows because the space between the rows becomes planting space.

Here's the updated schematic with increased spacing:


Now, a square feet will produce 9 carrots, but you only need eight of these squares to produce the desired 7 pounds of carrots, which is not a lot of land.

July 12, 2011

Crop rotation in your home garden

Let me start with an example of bad crop rotation (I do not always do as I preach ... :))


As you can see on the picture, the roots have bumps on them and are swollen. You can click on the picture to enlarge and see the details. These roots are tomato roots damaged by nematodes. Nematodes are a problem in Florida and they usually attack nightshade family of plants, such as tomatoes, peppers and eggplant.


One school of thought to remedy nematode problem is to "solarize" your soil, which involves covering the soil with plastic and let it sit in the heat of the summer, thus raising soil temperature to some 130 degrees and killing nematodes. I do not like this method because in addition to killing nematodes it will also kill beneficial insects and organisms that are much welcome in the garden, especially earth worms. If I were a fisherman, or fisherwoman, I could dig at least a shovel full of worms from my garden every day. And I like that! Earth worms make best manure because they eat and excrete plant matter, as well as dig furrows in the garden and aerate the soil.

So my answer to nematodes or other damaging pests is crop rotation. In a small garden crop rotation might be a challenging task. I have devised an "easy" plan to accomplish this.

First, divide vegetables that you plan to grow in three groups: Nightshade (tomatoes, peppers, eggplant and regular potatoes), Cover Crop (cowpeas, snap peas, beans) and Other (carrots, lettuce, broccoli, cabbage, okra, amaranth, radish, etc).

Second, draw your garden on a piece of paper and divide it in three parts, that's your master plan. I actually divide each bed into three parts, which takes care of dividing the whole garden. Then rotate your crop:

FallNightshadeCover CropOther

WinterOtherOtherCover Crop

SpringCover CropNightshadeOther

SummerOtherCover CropCover Crop

FallCover CropOtherNightshade

WinterOtherCover CropOther

SpringNightshadeOtherCover Crop

SummerCover CropCover CropOther

Pictured above is a 2 year rotation plan. As you can see, Nightshade family is not planted in the same space for a year and a half, which I think is a pretty reasonable time.

Since Nightshade family is most successible to pest damage, it is important to move it around; the rest of the vegetables, Other and Cover Crop are interchangeable: you can create your own rotation schedule with them freely depending on your vegetable needs.

In addition to crop rotation I always tuck flowers, especially Marigolds, and herbs in "Nightshade" and "Other" parts of the garden to provide bio-diversity and beauty to the garden, as well as attract beneficial insects.

July 5, 2011

Double-digging garden beds Part Two

Now that we have our first linear foot of the bed dug out, we should start filling it with organic matter. What constitutes an organic matter? If you have prepared compost, that would be ideal. I am one of these people who do not have ample compost at all times, so I have to improvise. Keep in mind that vegetation, dry or green, will decompose in the soil, so it does not have to be perfect compost that we put into the garden at all times. I have some "forest" on the property, so I go and rake up some fallen leaves, including oak and pine needles as some of my layers:


If you have something like that, put a six-inch layer of it into the dug hole. Then, cover with dirt. The rule of thumb for compost, which includes a compost pile or composting in place, is to mix roughly fifty-fifty proportion of dry and green matter. Fallen leaves will constitute dry matter. For a green matter the best things are grass clippings and kitchen waste. We eat a lot of vegetables in our family, so a 34 ounce coffee can fills up every two or three days. This is perfect green matter for a compost:


Again, just layer this green stuff on the top of the other sprinkled layer and cover with dirt:


The idea behind the double-dug beds is to loosen the soil and enrich it at the same time. There are no hard rules on how to do that. I know an old man in Cape Coral who only layers his new beds with dry and green palmetto leaves, and he grows some awesome produce, in fact he grows for the market as well. Work with what you have and have at least three layers of vegetable matter per the height of the bed.

June 29, 2011

Electric garden tiller: "Good Ol Rusty"

Without my Good Ol Rusty it would be impossible for me to build the garden that I have and to continue expanding it. The grass in Florida is extremely difficult to get rid of, once it is in the yard. I have possibly the worst kind of it, the Bermuda grass: the kind that sends the roots deep and wide and is very resistant to the gardener's efforts of eliminating it.

If you own a gas-powered tiller, you are in a good shape. I did not want to spend hundreds of dollars for the tiller, so after some research I settled on an electric one, who's name is Good Ol Rusty. He's been with me for about two years and done a lot of hard work in my garden:


When he was young, he looked like this:

Mantis 7250-15-02 3-Speed Electric Tiller/Cultivator with Border Edger and Kickstand

Here's some good things about him: He is quiet. Yes, he does the job without much grunting. He is familiar: tilling with him is like vacuuming, done in the same motion. He is easy to start, no need to pull any strings.

The negatives are, he is shallow; he is only tilling for about nine inches deep, and he jumps when he encounters a rock or a large root. Whether you decide to get someone like him to help you with your beds, or rent something like him, that would be a good decision because trying to dig beds by hand is a grueling and punishing task that might make you reconsider that whole gardening adventure.
 

Florida Gardening

Florida Gardening Blog

Visitors from all over the world

Grow Your Own Food

Grow your own food, be independent, healthy and happy.